Dynamic Rack Face Diagrams With PHP and GD
Anyone who has to manage servers and other equipment in remote datacenters can appreciate the need for good documentation. One reason you appreciate good documentation so much is because it’s so rare. People are lazy and forgetful and when changes are made by lots of different people in lots of different locations it’s easy for reference docs to get out of date and unreliable. So from those two concepts was born a need to create dynamic rack face diagrams and end the dependance on the manual task of updating and distributing static visio diagrams. Attached are templates for most common rack sizes and example php code on how to make it work.
In my case we added rack position info to an existing inventory database and was able to pull from that to generate a site display of all equipment racks.
Download Source: DynamicRackFaces
<?php
# Populate with device label, and how many rack units of space it takes up
# Two special cases... 'rackname' gets applied to the top nameplate area
# 'blankXX' append random strings or numbers to avoid a name collision in php arrays
# Example layout for a 24u rack
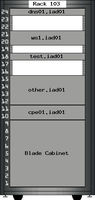
$rack = array (
'rackname' => 'IAD Rack 103', # 16 characters max for 150px nameplate
'dns01.iad01' => 1,
'blank23' => 2,
'ws1.iad01' => 2,
'blank12' => 1,
'test.iad01' => 1,
'blank20' => 2,
'other.iad01' => 4,
'cpe01.iad01' => 2,
'Blade Cabinet' => 9,
);
drawRack($rack, 'BlankRack24u.png');
function drawRack($r, $racktemplate)
{
$template = imagecreatefrompng($racktemplate);
# Initial offset from the top left corner to begin placing 'servers'
$dstX = 27;
$dstY = 22;
foreach ($r as $name => $u)
{
# This defines the nameplate at the top of the rack
if ($name == 'rackname')
{
$nameplate = imagecreate(150,20);
$background = imagecolorallocate( $nameplate, 255, 255, 255 );
$text_colour = imagecolorallocate( $nameplate, 0, 0, 0 );
imageCenterString($nameplate, 5, $u, $text_colour);
imagecopy ($template, $nameplate, 52, 1, 0, 0, 150, 20);
continue;
}
$deviceimg = imagecreate (200, (20*$u));
drawRackDevice(&$deviceimg,$name);
imagecopy($template, $deviceimg, $dstX, $dstY, 0, 0, 200, (20*$u));
$dstY += (20*$u);
imagedestroy($deviceimg);
}
# You could also save it to a file on disk
header( "Content-type: image/png" );
imagepng( $template );
imagedestroy($template);
}
function drawRackDevice ($img, $text)
{
$background = imagecolorallocate( $img, 157, 158, 156 );
$text_colour = imagecolorallocate( $img, 0, 0, 0 );
$line_colour = imagecolorallocate( $img, 0, 0, 0 );
# If this should be a blank space.. make a transparent 'server' to fill the gap
if ((strlen($text) == 0) or strstr($text, 'blank'))
{
imagecolortransparent ($img, $background);
} else {
imageCenterString($img, 5, $text, $text_colour);
imageline ($img, 0,0,200,0, $line_colour);
imageline ($img, 0,imagesy($img)-1,200,imagesy($img)-1, $line_colour);
}
}
# Found in comments on the php docs site
function imageCenterString(&$img, $font, $text, $color)
{
if($font < 0 || $font > 5){ $font = 0; }
$num = array(array(4.6, 6),
array(4.6, 6),
array(5.6, 12),
array(6.5, 12),
array(7.6, 16),
array(8.5, 16));
$width = ceil(strlen($text) * $num[$font][0]);
$x = imagesx($img) - $width - 8;
$y = Imagesy($img) - ($num[$font][1] + 2);
imagestring($img, $font, $x/2, $y/2, $text, $color);
}
?>